Slide to unlock: 28 iPhone tips and tricks to make your life easier
The iPhone has tonnes of functions hidden up its sleeve that you've yet to discover (Updated for iOS 8.3)
Most of us spend more time tapping away on our iPhones than we we do breathing and blinking. But there’s a good chance you might have missed a few tricks still hidden up its iSleeves.
Hidden within the recesses of the iOS 7 are skills that you might not have known your iPhone was capable of, and we’ve rounded up some of the best time-saving moves to enhance your iPhone experience even further.
Activate parental controls
Situation: You’ve got a kid who wants to play with your new iPhone, but you don’t really want him accidentally deleting all your photos. You make him promise to only play Candy Crush and not touch the rest of your stuff. Of course, he doesn’t listen and you lose half of your contacts while gaining an enormous App Store bill for all the randomly downloaded games.
Kindness doesn’t have to end so badly: thankfully, you can turn on restricted access before giving a kid free reign over your phone.
Solution: Under Accessibility is where you’ll find Guided Access. Turn it on and you can even tweak it so that a sound plays and the remaining time is voiced out. While running the app you want to allow Guided Access to, just triple-click the Home button to bring up the option.
You’ll be prompted to draw circles around the options you want off limits to the kid (like the danger zone that is the option to buy add-ons for a game) . When you tap on options, you can further disable functions like the volume button and the keyboard, as well as set a time limit for Guided Access if need be.
Zoom, zoom, zoom
Situation: The iPhone 6 and 6 Plus are both a step up in size, but you might still find yourself squinting at the screen from time to time. Why not pinch out to zoom, you ask? Because while you can do that on photos and certain apps like Safari, it won’t work with third-party apps. It’s also great when you want to show your grandparents something on your phone.
Solution: Go to Settings, Accessibility, then Zoom to turn the feature on. You can pre-set your Zoom feature functions like the Zoom Region (full screen or an adjustable window) and the Maximum Zoom Level (how big you want things to appear).
Just double tap on the screen with three fingers to call the magnifier up. Shift it around, resize it, or tap on it for more options. You can use it in third-party apps, the locked screen, wherever fine print shows up and whenever your eyesight fails you. Pretty handy, huh? It’s also really good for noticing details on app icons you might have never realised existed before.
Surf the web on the downlow

Situation: If you don’t want anyone to find out what you’re looking at on the internet, you can browse in private mode. Yeah… we know what you’re thinking, but it could be that you’re over at your girlfriend’s and using her iPhone to look for a gift for her, or you simply never want the fact that you read celebrity gossip to get out.
Solution: Tap on Safari, then the Tabs icon at the bottom right and it’ll bring up a new toolbar at the bottom. Tap on Private, and all the sites you visit using this incognito version of Safari (shown by the stealthy grey colouring of the window) will not show up in your search history, or the Autofill bar for that matter. After all, no one needs to know you thrive on the latest news of Hollywood pairings.
Revive a closed tab
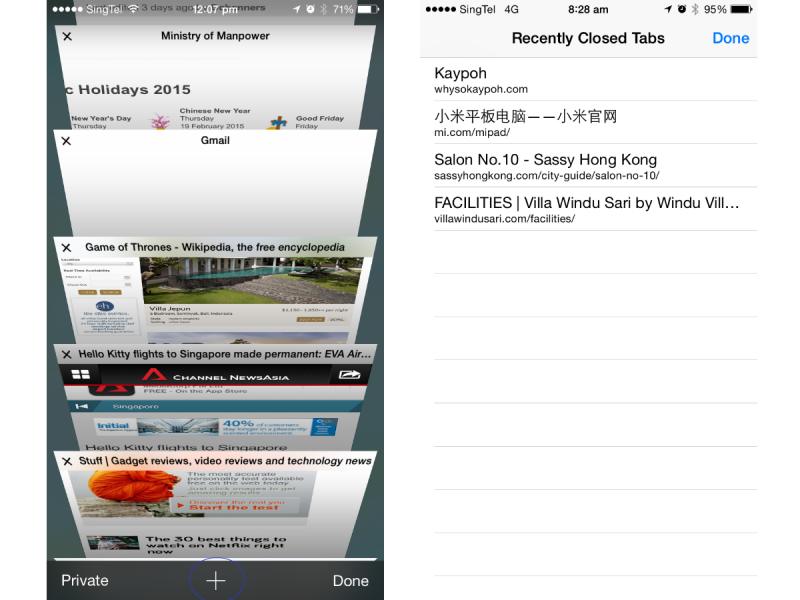
Situation: Had one of those derpy finger spasm moments and accidentally closed a tab? Can’t quite remember what the URL was? You could go the long way and look at your Safari history, or you could just do this instead.
Solution: Tap on the Tabs icon at the bottom right of your Safari window. See the “+” sign in the middle? Tap and hold that to bring up a list of your Recently Closed Tabs for quick easy access.
Let your screen speak to you
*Turn the volume up to listen
Situation: You don’t have time to open and go through all of the 682 new emails that you have accumulated while you were on holiday. Besides, you’ve got other things to do. But if your subconscious is, well, conscious enough, you can mentally absorb the content of your emails being read to you while you pursue other more pressing professional concerns.
Solution: You’ll find Accessibility under Settings. From there, go to Speech and enable Speak Screen. Swipe downwards with two fingers on a screen to bring up the voice controls. We’ve found it plenty useful for reading our emails out to us while we’re doing other things. But that’s only if you’re as adept at multitasking as we are. Otherwise, you can just let Speak Screen read you to sleep, we suppose.
Just bear in mind that this feature is limited to iMessages, email, books, and webpages.
VoiceOver
*Turn the volume up to listen.
Situation: Designed to assist the visually impaired, VoiceOver is pretty much buried in the settings – and off most users’ radars. You wouldn’t think that there’s any use to it, but don’t write it off so quickly: it’s an in-depth feature that Apple has put a lot of thought into. Best to get acquainted with it, because you never know when you’ll need it – like when you’re trying to discretely operate your phone (with your earphones plugged in, mind you – if not the voice will give your actions away).
Solution: Open up Settings, then Accessibility, and lastly VoiceOver. Where Speak Screen won’t read text to you, VoiceOver will. It has a cool rotor control that allows you to turn the touchscreen dial to pick whatever you want read, whether it be headings or just text. However, enabling this function will require that you interact with your iPhone in a very slow way as a black box highlights and reads out the information of whatever you’ve just tapped, and you have to tap twice to activate a function.
In Camera mode, it even reads out how many faces are detected and where they’re positioned within the shot. Be warned though, this feature gets annoying really quickly – it was never designed to be for our entertainment.
Activate functions with your head
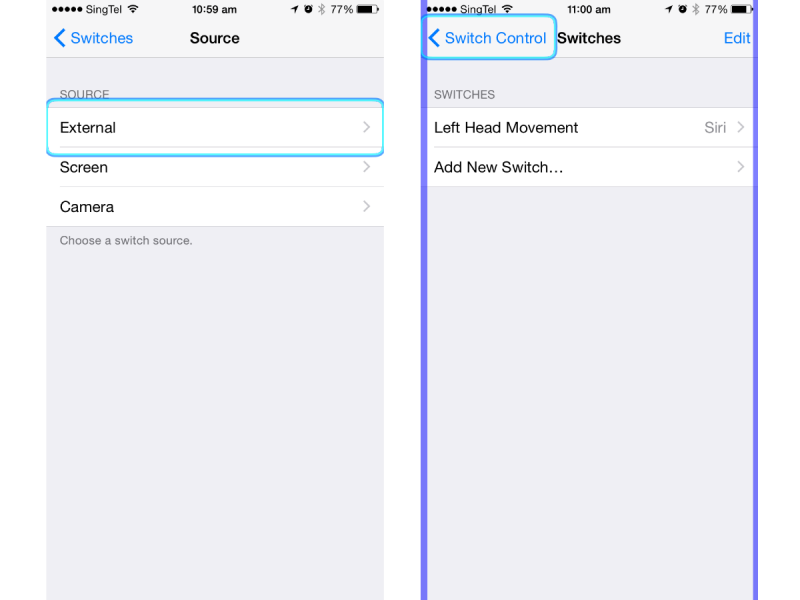
Situation: Samsung created a flutter on the internet with the Galaxy S4’s eye tracking prowess. In reality, it was more of a head movement tracking feature. Remember when your Android-loving friend bragged about it? Guess what: the iPhone does it too.
Solution: While Apple created this function for people with mobility problems in mind, it’s still fun for a party trick. You can set the camera to track head motions in order to activate features, like Turn Head Left to call up Siri or Turn Head Right to go back. Your iPhone has to be held a reasonable distance away from your face though; it will prompt you when your face is too close or too far away so you can make the necessary adjustments.
Get a home button on your touchscreen
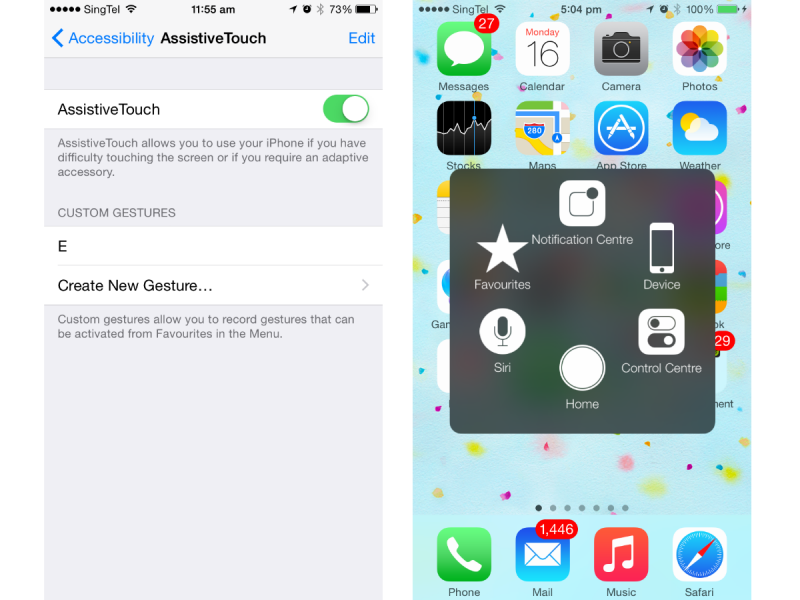
Situation: Your Home/Volume/Sleep button is damaged, and you have no time to get it repaired. You don’t have to rummage around looking for an ex-iPhone to use in the meantime – all you need is Assistive Touch.
Solution: Head over to Settings, then Accessibility, and scroll to the bottom to find AssistiveTouch under Interaction. Enable that to bring up a whole range of shortcuts (such as taking a screenshot to creating your custom gestures), including a movable Home button icon that will magically appear on your screen.
Swiftly find word definitions
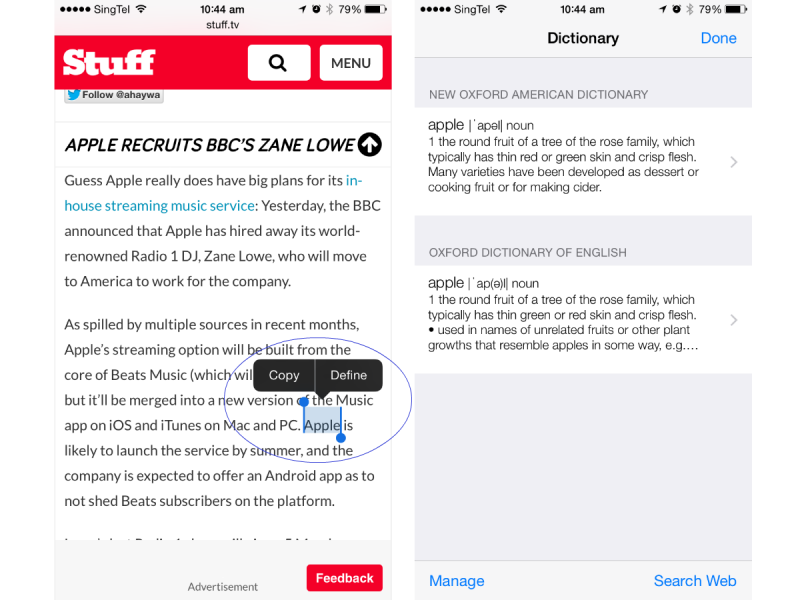
Situation: You’re reading a long essay on the importance of using the right cheese in mac and cheese. You come across a word you aren’t quite familiar with, but its meaning is paramount to the your holistic comprehension of said answer. You don’t want to interrupt the flow of your reading to open a new web tab and google it. You can get the answer right there and then.
Solution: Highlight the word that’s insulting your intelligence, tap on it and then tap Define. And iOS 8 will do the rest for you, delivering meaning at a single tap, without you having to open up another tab and type in the word yourself.
Shake to untype
Situation: You’ve just typed out a miniature essay, and realised that you can do better. Instead of repeatedly tapping or holding down the backspace key, there’s another way to undo what you just typed.
Solution: To reverse your words, all you have to is shake your iPhone and the undo prompt will pop up. Have another change of heart and want to redo what you just undid? Just shake your phone again and the redo prompt will pop up to restore your text. This shortcut works across all typing apps, so happy shaking, you fickle typer.
Triple Click to invert
Situation: If you’re one of those who likes to use their phone in the dark just before going to bed and find all that white in your display awfully glaring, there’s another way to ease the strain on your eyes aside from turning the brightness on your screen down.
Solution: Invert the colours by going to Settings, General, followed by Accessibility, where you scroll right to the bottom and hit Accessibility Shortcut and choose Invert Colours. So whenever the lights are off, just triple click the home button to invert the colours on your display.
This feature is meant to help people with dyslexia, but we find it also comes in handy for using your phone discreetly in a darkened room without it casting a ghostly glare on your face.
Where’s the word?
Situation: You’re trying to find a particular word or phrase on a site. You don’t have to read through the entire article to find what you’re looking for. There’s an easier way to get to it.
Solution: Type the word or phrase directly into the address bar and the phone will bring up a list of results. To find it on the page, scroll all the way down to see On This Page, tap on it, and it will highlight the word in yellow and take you through all of the matches till you find what you’re looking for.
Use EarPods to take a shake-free photo

Situation: Whether it’s tapping the capture button or pressing the volume up or down buttons to take a photo, there’s a chance that a little bit of movement could be introduced into your photo as you’re applying pressure on it, introducing annoying blur. But did you know you can take a photo without having to touch the iPhone at all?
Solution: EarPods (or any other made for iOS earphones) to the rescue! Just stick them into your iPhone, activate the Camera app and use the remote as a temporary remote for your camera app too. Hit either the volume up and down buttons to take a shake-free photo. Also works for more natural-looking selfies.
More than meets the eye
Situation: Typing in the name of a foreign European address? Chances are there are a few accents in the words you’re using. How about the symbol for cents? Handily, the iPhone’s keyboard hides more keys than those that are laid out.
Solution: To find the key you need, all you have to do is tap and hold the corresponding key. For example, if you tap and hold down the ‘$’ key, you’ll also find the currency keys used to denote cents, pounds and even yen. Doing the same on letter keys bring up accents.
View more in landscape
Situation: Want to view more in your calendar but frustrated by its small screen? There’s a simple solution to viewing more than one day at a time.
Solution: Just turn your phone sideways to landscape view when in Calendar to see a full five days. Also, doing so when you’re using Calculator brings up additional scientific calculator functions.
Time travel to the top
Situation: You’re utterly engrossed in a website and have read a really long article all the way to the end. Want to get back to the top to another tab on the site you want to visit? You don’t have to rub a blister on your thumb by repeatedly scrolling downwards.
Solution: To get back to the top, just double tap the time at the top of your screen to fly right back to the start. Works for Instagram and Facebook too, when you get carried away browsing long feeds. Simple, eh?
Swipe back and forth
Situation: You’re browsing web pages and scrolling makes the navigation toolbar disappear. To go back to the previous page, you don’t have to constantly tap on the screen to make it reappear, which can be laggy when the page is still loading.
Solution: Swipe to the left to go forward or to the right to go back. Just make sure you’re doing it right from the edge to make the gesture properly register. Works in Mail and Safari as well.
Do not disturb mode
Situation: The Do Not Disturb mode is a great way to allow you to focus by restricting the type of calls allowed to your phone. You can silence selected calls and notifications, and even only enable a call when it’s the second time the same number is calling. Great for light sleepers who don’t want to be disturbed. But what if you forget to set it up?
Solution: You can choose to do it manually if you want a certain period of focus everyday. But if it’s a daily occurrence, remember to switch off Manual mode and tap on Scheduled to set your desired do-not-disturb time period, say 11pm to 7am when you sleep. It will kick in every night to keep your precious snooze time from being interrupted, and you don’t even have to set it up every night before you sleep.
Typing shortcuts
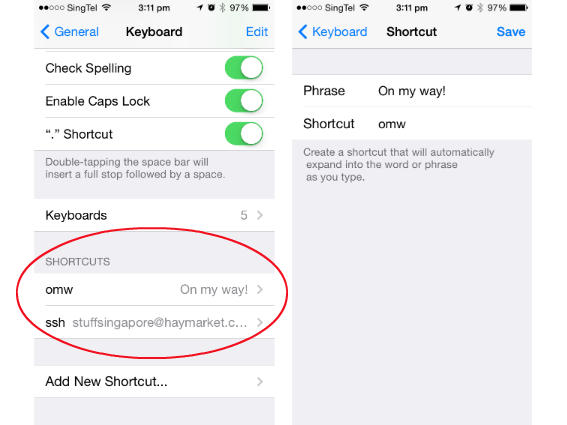
Situation: Do you have your very own phrases that your friends understand but autocorrect clearly doesn’t? Or are you just tired of having to always type your long email address, character by character, to people? There’s a shortcut for minimising typing action.
Solution: Create your own keyboard shortcuts by going to Settings, General, then Keyboard. Scroll to the bottom of the page to add a new shortcut that’ll expand into the phrase of choice. Just make sure you remember what they are.
Unspam your messages
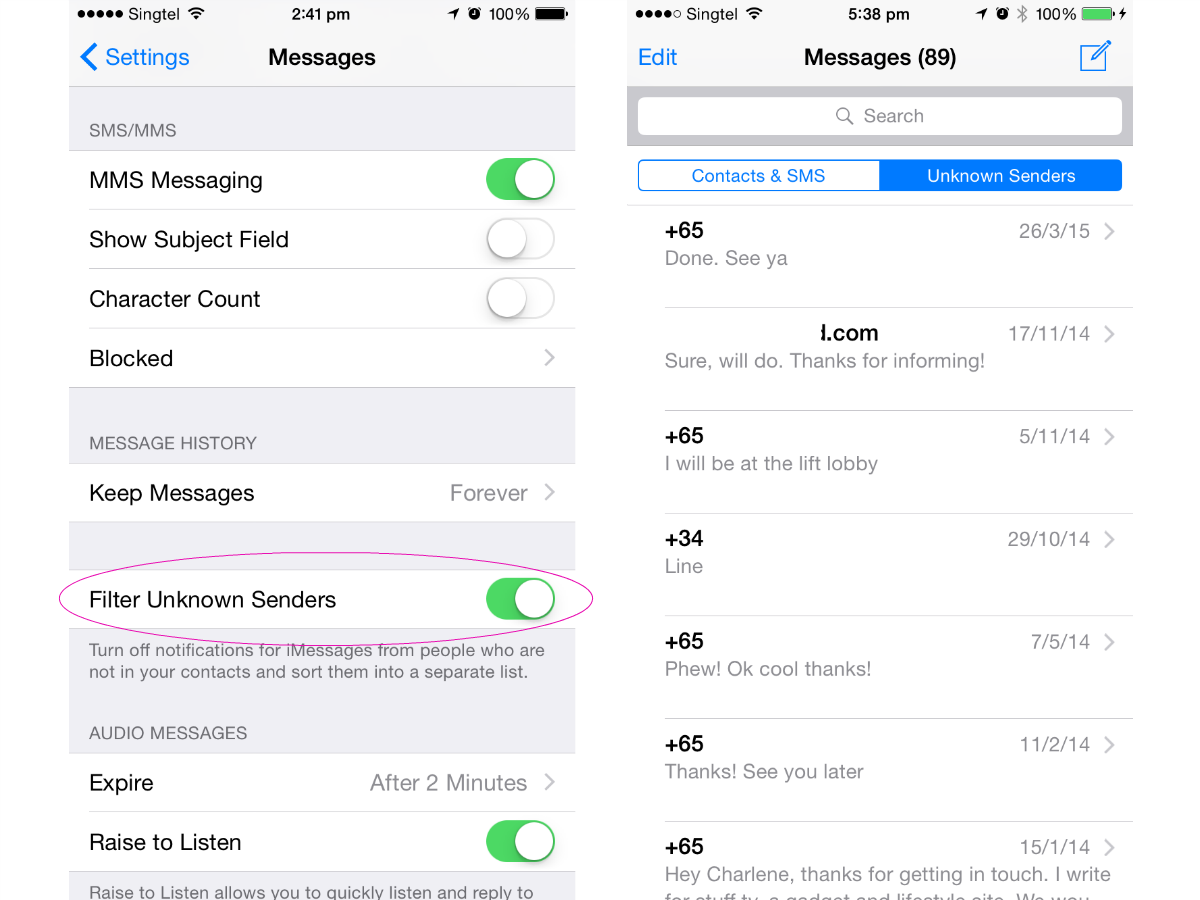
Situation: Your Messages inbox has probably become a jungle of spam, alerts from mailing lists you don’t remember signing up for and a secrets discovered by one weird housewife that your doctor will hate!
Solution: Go to Settings, then Messages and scroll to the bottom to check Filter Unknown Senders. If you head back into your Messages app, you will see that your Inbox is now divided into two categories: Contacts & SMS as well as Unknown Senders, so messages from unknown senders will be diverted into the latter.
Improve Siri’s ear
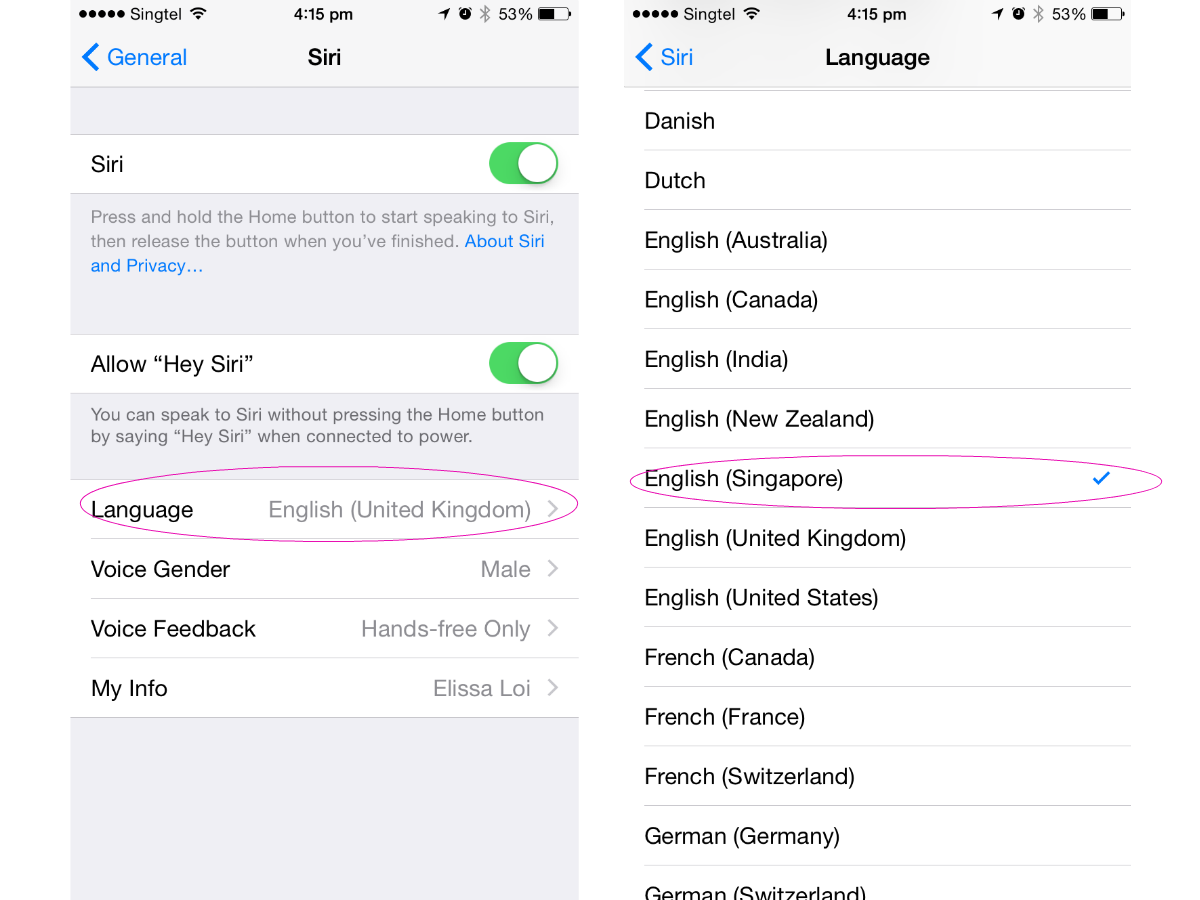
Situation: Accents can be a little hard for the California-born Siri to comprehend. Thankfully, there’s a simple tweak you can make to ensure nothing is ever lost in translation again.
Solution: Head over to Settings, then General, and then Siri. Under language, you’ll find a selection of different languages. Select whichever one you fancy, and Siri will understand you a whole lot better without you having to put on a poorly-faked American accent.
Politically correct emojis

Situation: The latest iOS update provides a full range of emojis with various family and couple-types, so that everyone is represented and more importantly, feels included and equal.
Solution: Tap on any people-type of emoji to bring up a selection of skin shades. You get six different choices, including the default Simpson-yellow. Even gestures like the good old fist bump have been translated into different skin colours.
Email reply notifications
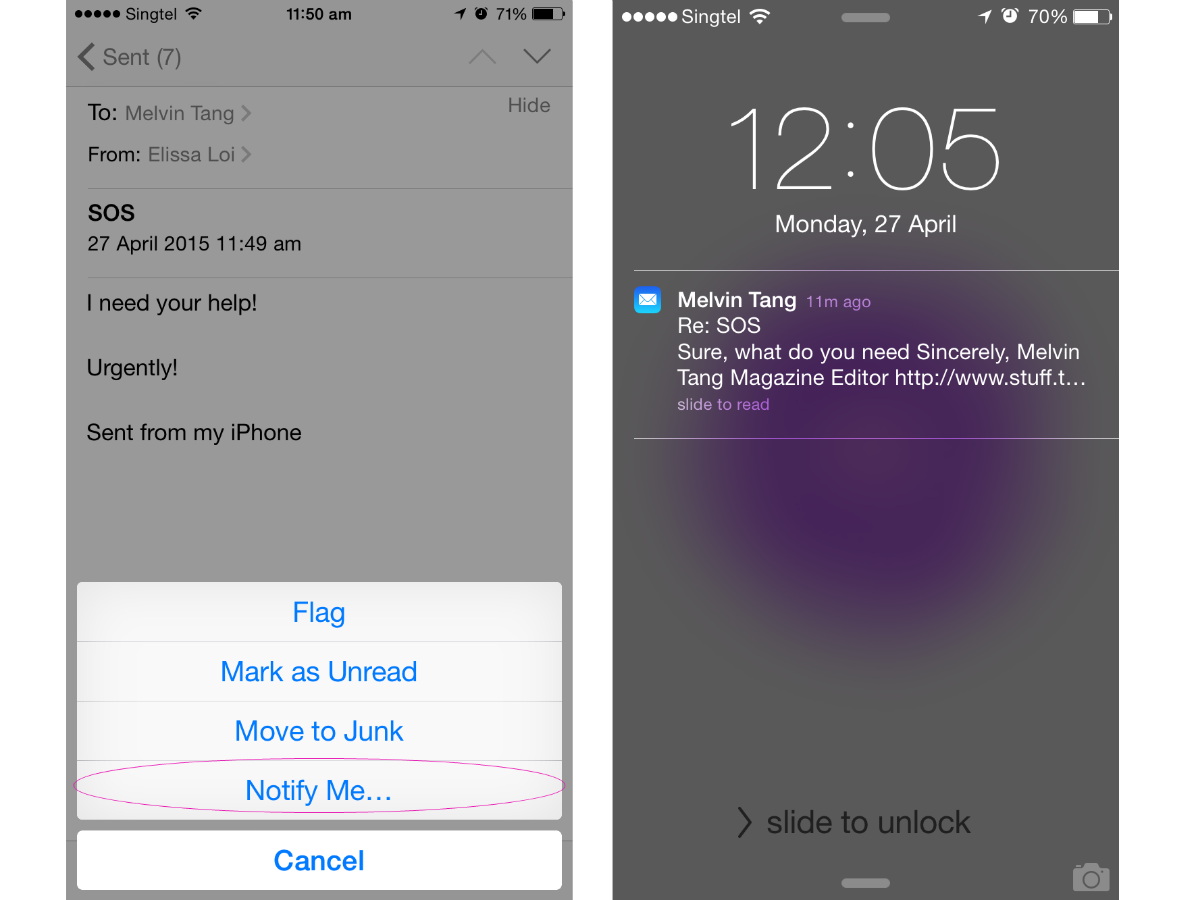
Situation: You’re waiting on a reply for an urgent email you’ve just sent out. You can either keep going into your inbox to see if it has arrived (but ain’t nobody got time for that), or you can let your inbox notify you while you work on other more pressing matters.
Solution: To stay on top of things, go to the email thread in question. Tap on the flag icon in the bottom left corner and then Notify Me… After you confirm, you will receive notifications when anyone CC-ed in the email replies. Tap on the flag icon after the emergency is resolved to Stop Notifying.
Complicate your password
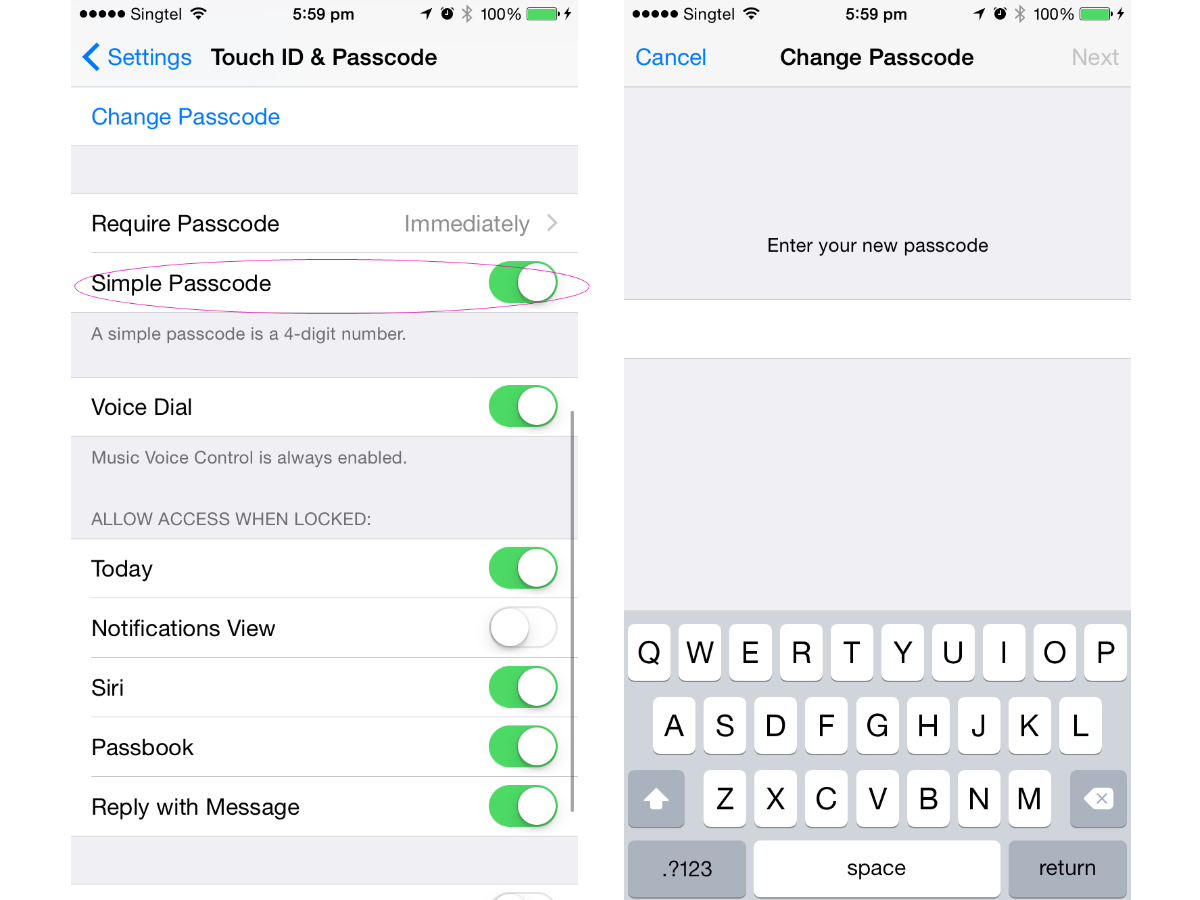
Situation: The iPhone’s default 4-digit passcode setting isn’t the most secure. It’s not difficult for a stranger to watch you key your passcode in, then steal your phone. Tadah, now they’ve got access! Don’t worry though, your iPhone’s got the answer. You can exchange the 4-digit code for a more complicated and thus more secure password.
Solution: You can have our phones but not our passwords! To activate, go to Settings, then Touch ID & Passcode to disable Simple Password. After which, you’ll be prompted to enter your all-new password riddled with numbers that no one can crack with a glance. Ha!
Data self-destruct
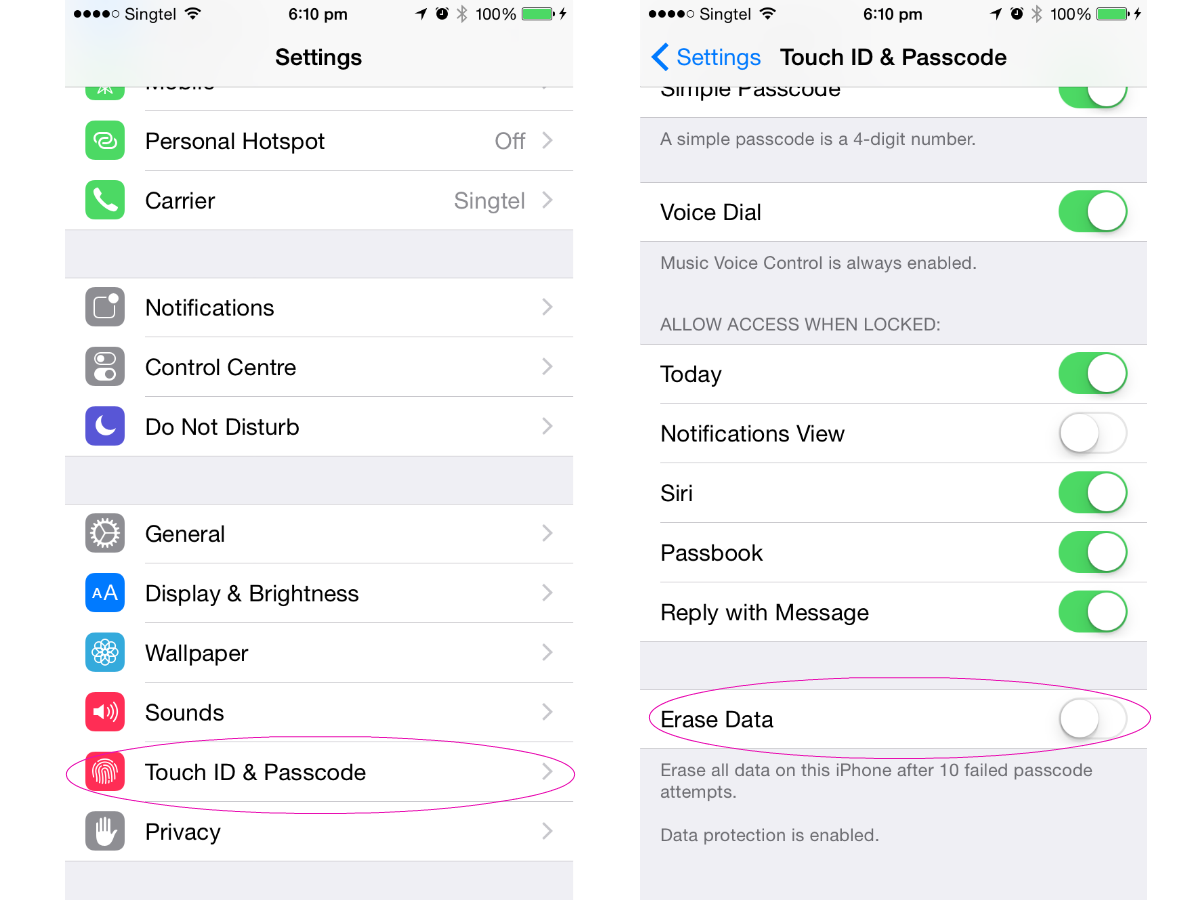
Situation: You have a lot of secrets on your iPhone, information which should never be shared with anyone else. You panic when someone so much as glances at your phone while you’re texting. Secret missions, shopping lists. That sort of stuff.
Solution: Go to Settings, then Touch ID & Passcode, and scroll all the way down to find Erase Data. Enable that if you’re so paranoid about people accessing your top secret information. After 10 failed attempts to access your phone, all your data on your iPhone will be erased.
Bear in mind that you might try (and fail) to unlock your own phone and unwittingly destroy all of your data. But that’s not a big deal if you regularly back up your phone, just a little bit of hassle that should teach you a lesson.
LED flash for alerts
Situation: If you’d like a more discreet way of alerting yourself to notifications, you can enable light instead of sound alerts, so that your iPhone won’t vibrate off the table or interrupt your important meeting with brash sound alerts. You can use the iPhone’s flash to give you a sign.
Solution: Bring up Settings, then General, and Accessibility to enable LED Flash for Alerts. Now you can turn your iPhone facedown yet never have to worry about missing a notification. It will flash twice, you won’t be able to miss it unless you’re really engrossed in your meeting, but we all know that’s not going to happen.
Undo deletion of an email
Situation: A combination of Monday brain and incoordination has led to you accidentally deleting an email. Don’t panic, there’s a shortcut to undoing your mistake.
Solution: Keep calm and shake your phone. That’s right, there’s nothing wrong with your eyes. We said to shake your phone. And a box asking if you’d like to Undo Move will pop right up. Tap that to get your deleted email back. Shake again to Redo Move.
AirDrop images
Situation: You’ve got a ton of images from a wedding weekend or a gathering that you want to send to someone for his personal consumption. The easiest way to go about sending photos directly (if the other person owns an iThing) without consuming a ton of data and wasting a lot of time uploading and downloading them after is AirDrop.
Solution: Select the photos in question in your Camera Roll, then the little share icon at the bottom left. Make sure you’ve turned AirDrop on in your settings and the option should pop right up. Tap that and then your friend’s device which should show up if you’re on the same network to seamlessly deposit the photos in his own Camera Roll. No fuss, no muss. Just make sure you have both Wi-Fi and Bluetooth turned on.
READ MORE: 18 ways you’re unknowingly killing your iPhone battery


